
Construction · In photographs
One kitchen, photographed at every stage.
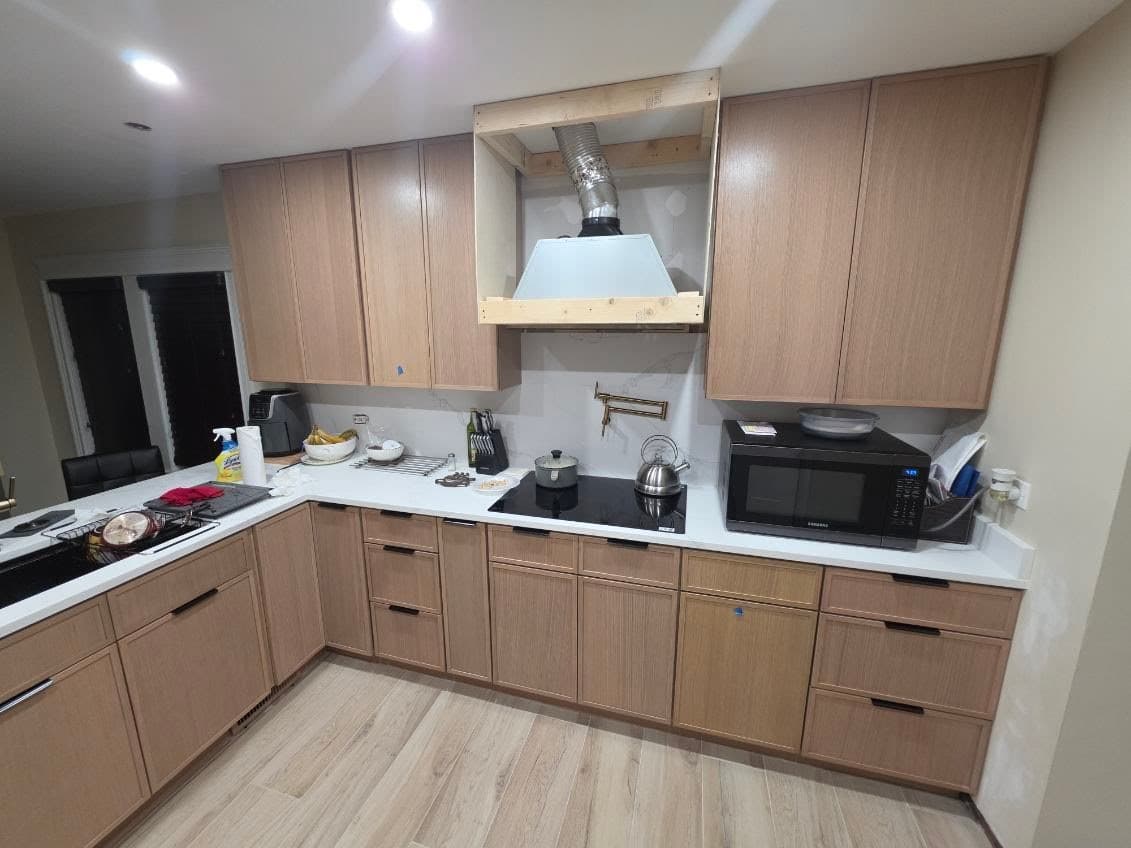
The stage pages explain what happens in order. This page shows it in one room: a dated kitchen with oak cabinets and a laminate counter, taken to the studs, rebuilt behind the walls, floored, fitted with rift oak cabinets and finished with white quartz. The photographs were taken by our team as the job went on, and the captions say what was happening that week.
At a glance
The job in brief.
A kitchen that kept its footprint: the sink stayed under the window, the range on the same wall, the refrigerator by the door. The old cabinets, counters, tile floor and two earlier floors under it came out; new drain lines went into the subfloor; the walls were rebuilt in drywall; a wood-look porcelain floor went down; rift oak cabinets, a white quartz counter and backsplash and a black hood went in.
A kitchen like this typically falls between $40,000 and $75,000 before selections and takes six to eight weeks of construction, with design and ordering before that. The figures are planning guidance as of September 2026, not this project’s numbers.
The sequence
Seven photographs, six weeks.
Each caption below the photographs names the stage and what the crew was doing that week. The stage pages go deeper on each.
- 01
Week 0: the existing kitchen
Oak cabinets, a laminate counter, a white drop-in sink and a tile floor over older floors. Floor protection is already down in the next room.
- 02
Week 1: demolition
Uppers off the wall the first morning, then counters, bases and the floor. Two days later the room is down to the studs and the original subfloor.
- 03
Weeks 1 to 2: rough-in
New drain and supply lines set into channels in the subfloor and the walls, wiring in conduit to the new outlet and light positions, the wall by the door insulated. Inspected before board.
- 04
Weeks 2 to 3: drywall and floor
Board hung, taped and mudded with the boxes marked; wood-look porcelain set with leveling clips over the flattened floor.
- 05
Week 4: cabinets
Rift oak uppers and bases set level along the wall, the island cabinets braced in place. The countertop template the next morning.
- 06
Weeks 5 to 6: counters, backsplash and trim-out
White quartz set with a matching backsplash, the sink and faucet back in, the hood and lighting connected, hardware on, doors aligned.
- 07
The walkthrough
The finished kitchen in use: rift oak, white quartz, the black hood over the range and the light floor running through to the door.
From our jobs
What this stage looks like.
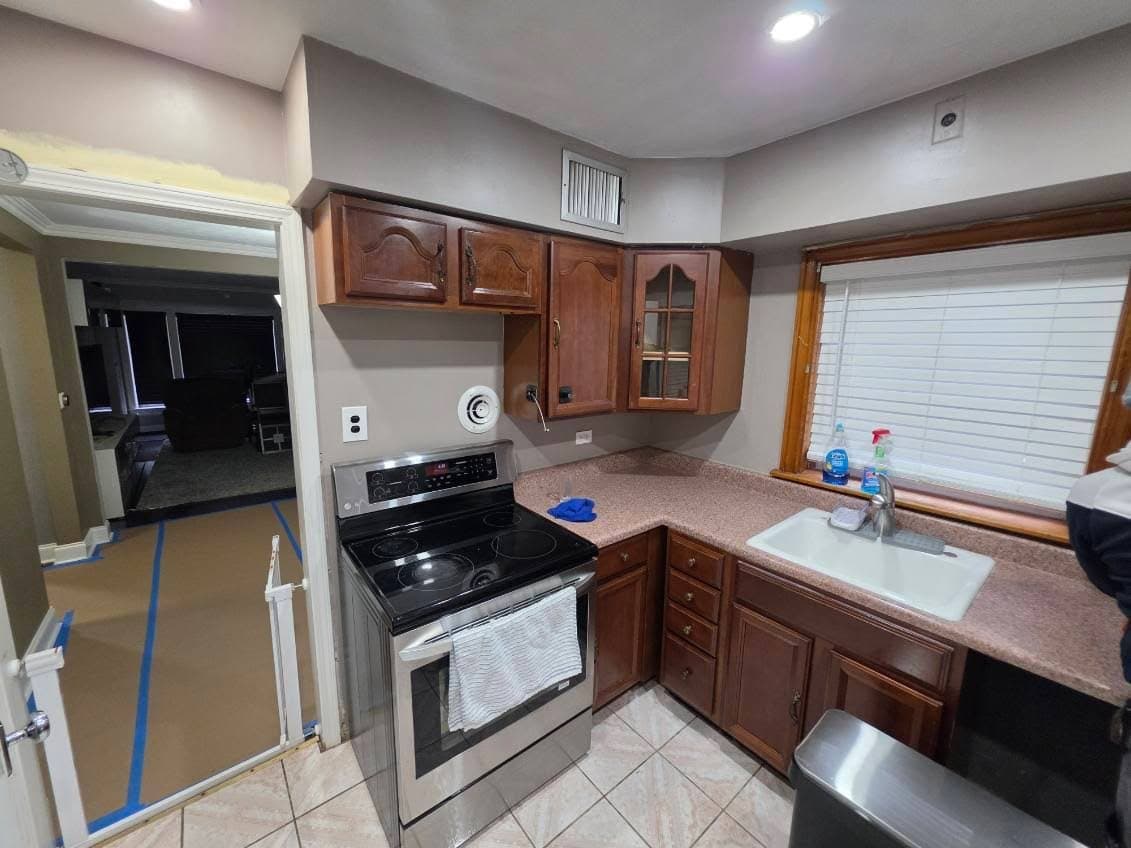
Week 0. The kitchen the day before demolition, with the protection already taped down in the next room. 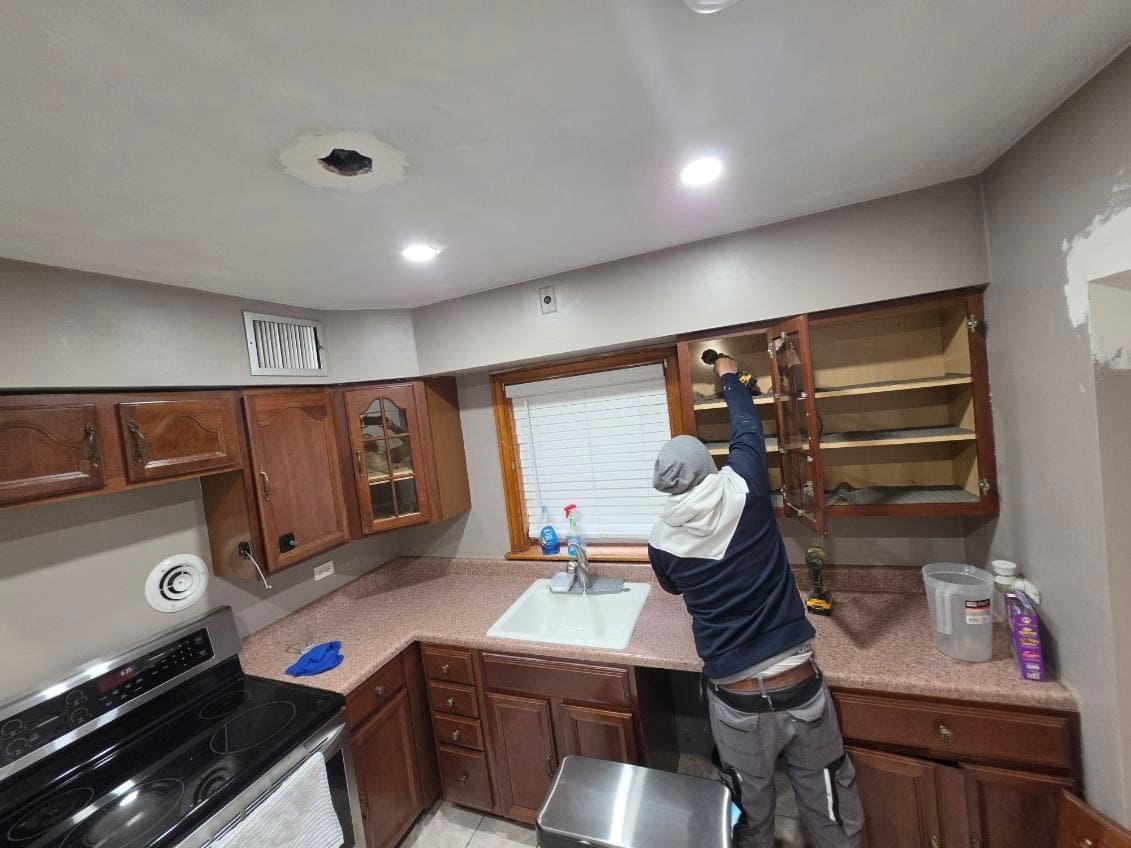
Week 1. The old upper cabinets come off the wall on the first morning. 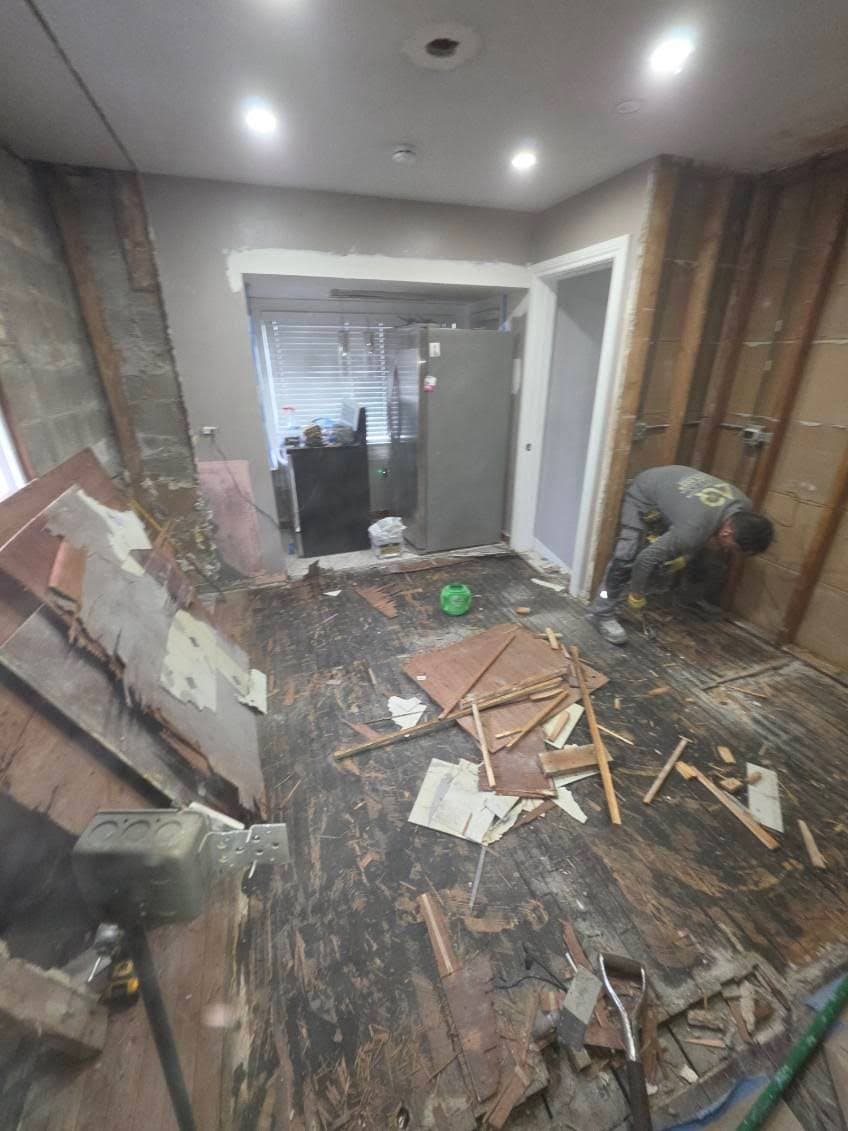
Week 1. Down to the studs and the original subfloor. The lath and old flooring on the floor were what the walls had been hiding. 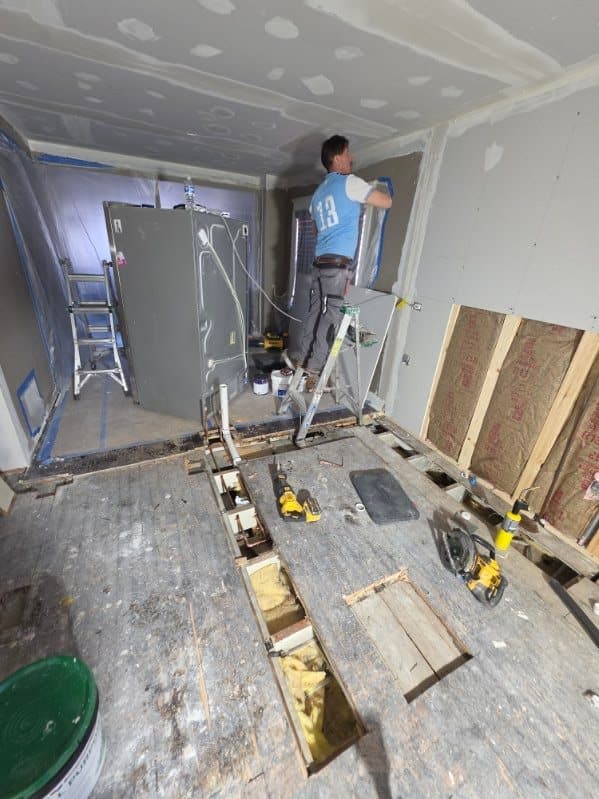
Weeks 1 to 2. New drain lines set into channels cut in the subfloor after the ceiling board went up, with the wall by the door insulated. 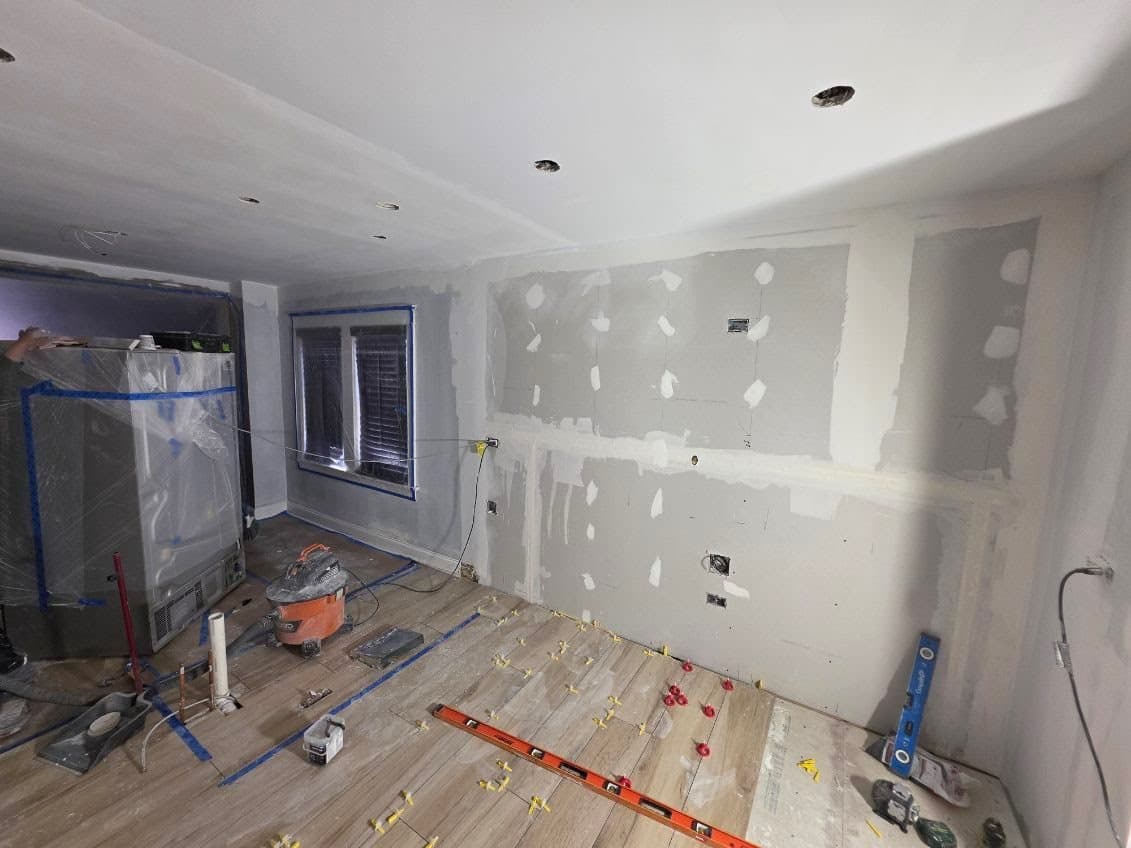
Weeks 2 to 3. Walls taped and mudded with the outlet boxes marked, and wood-look porcelain going down with leveling clips. 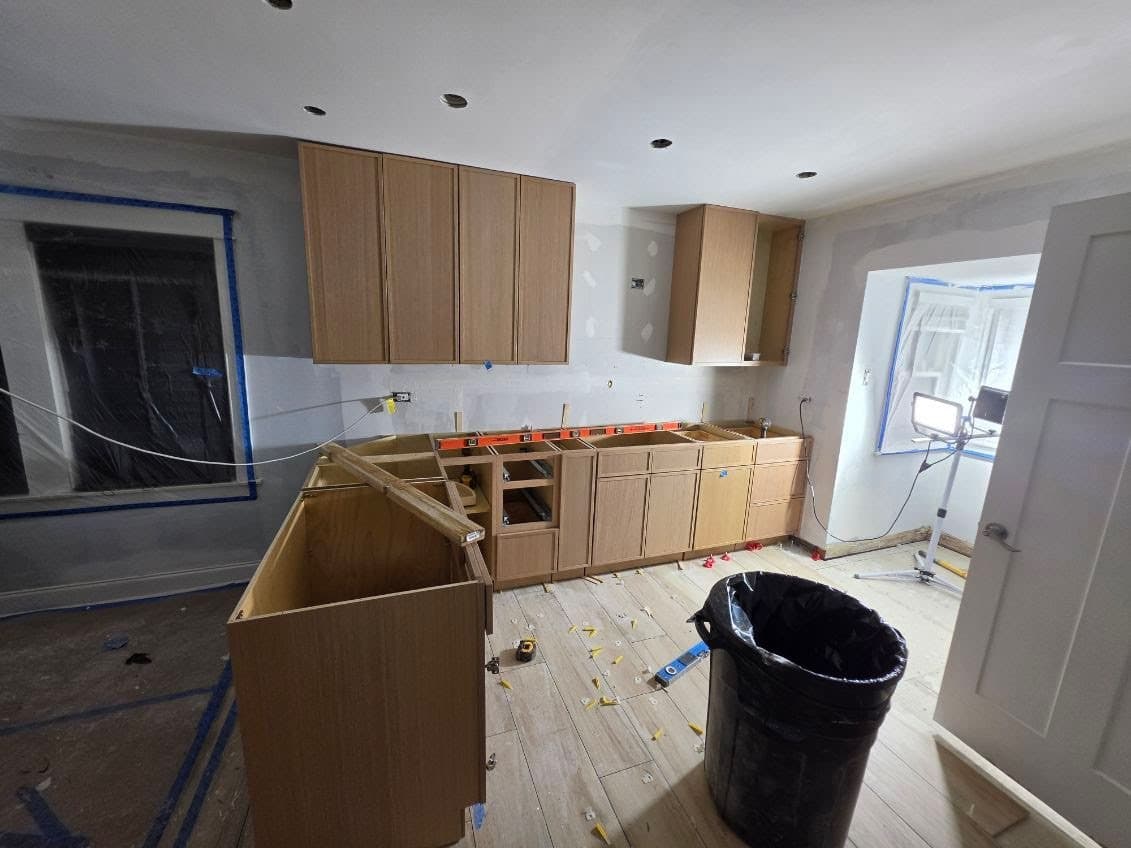
Week 4. Rift oak cabinets set level along the wall, the island braced in place before the countertop template. The walkthrough. Rift oak cabinets, white quartz counter and backsplash, a black hood and the light floor running through the room.
Photographs taken by our team during construction, captioned by stage. They are not design references.
What this job shows
Three things worth noticing.
The kitchen kept its footprint, and it still needed everything behind the walls redone: the old drain lines and wiring were not going to last another cabinet cycle. The floor went in before the cabinets, so the boxes sit on the finished tile. And the room was out of use for about six weeks, with the family cooking in the dining room on a table, a microwave and the old refrigerator.
- Keeping the layout kept the cost in the lower planning range, and the plumbing was still replaced while the walls were open
- The floor went down before the cabinets so the toe kicks sit on the finished tile
- The cabinets arrived the week the drywall was primed, because the order went in the week the proposal was signed
- Nothing in the finished room was decided on site; every position came from the drawings
At each stage
The checkpoints this job passed.
The same list every job goes through, in the order it happened here.
- 01
Before demolition
Cabinet delivery date confirmed, permit filed, tile and fixtures on site, temporary kitchen set up.
- 02
After demolition
Open-wall review with the homeowner: old drain lines and subfloor condition written up and priced.
- 03
Before drywall
Rough plumbing and electrical inspected and passed, every wall photographed.
- 04
Before cabinets
Walls checked flat and plumb, floor down and level, primer dry.
- 05
Before the template
Every box fixed and level, the sink and cooktop on site.
- 06
Before the walkthrough
Every fixture run, every circuit tested, doors aligned, caulk and grout complete.
Questions
Common questions about one kitchen, start to finish.
Is this a typical timeline?
For a kitchen that keeps its layout, yes: six to eight weeks of construction is typical. Moving plumbing and gas adds a week or two; removing a load-bearing wall adds more. The timeline guide has the full breakdown.
Why did the plumbing need replacing if the sink stayed where it was?
Because the old drain lines and supply were at the end of their life, and an open wall is the cheapest moment to replace them. Keeping the layout kept the cost down; it did not mean keeping the old pipe.
Where did the family cook?
In the dining room, on a table with a microwave, a kettle and the old refrigerator, set up before demolition. The living-through guide describes the arrangement in detail.
Can I see more finished kitchens?
The gallery shows recent projects by our team, each labeled with its location and contractor, and the ones with the most photographs have their own page.
Ready to start the first stage?
Include photos with your inquiry for complimentary render previews within minutes. Photos are optional.
Prefer to talk first? Call or email during business hours.
- Call
- (312) 210-0016
Related
- How the four stages workInquiry, in-home visit, proposal and build.
- Before construction startsThe first of the stage pages.
- Small kitchen remodelingCompact kitchens that keep their footprint.
- Recent projectsFinished kitchens and bathrooms by our team.
- Living through a kitchen remodelThe temporary kitchen, dust, deliveries and realistic expectations.